If you’ve ever wondered how to create your own delicious and unique beer at home, then you’re in the right place. Homebrewing has gained tremendous popularity in recent years, allowing beer enthusiasts to experiment and craft their own personalized brews. Whether you’re a curious beginner or a seasoned drinker looking to expand your horizons, this comprehensive guide will take you through the essential steps of home brewing. From selecting ingredients to fermentation and bottling, we’ll cover everything you need to know to embark on your homebrewing adventure. So grab a cold one and let’s dive in!
Introduction – What is homebrewing?
Homebrewing is the art of crafting beer at home using various grains, hops, yeast, and water. It’s a fascinating process that allows you to create unique flavors and styles tailored to your taste. From light lagers to hoppy IPAs or malty stouts, the possibilities are endless. But why should you consider homebrewing, and is it legal?
Why should you homebrew?
Homebrewing offers a range of benefits that make it an fun hobby. It allows you to fully control the ingredients used in your beer, granting you the freedom to experiment with flavors and create something truly distinct. Additionally, homebrewing is a fun and rewarding way to develop a deeper appreciation for beer and its intricate brewing process. Imagine the satisfaction of sharing your self-crafted brews with friends and family, receiving their enthusiastic praises for your brewing skills!
Is homebrewing legal?
The legalities surrounding homebrewing vary by country and region. In many countries, including the United States and Canada, homebrewing is legal for personal consumption without requiring a license.
However, it’s essential to research your local regulations to ensure compliance. Some areas may have limitations on production quantities or taxes imposed on homemade beer. Always consult local brewing organizations or authorities to understand the legalities in your area.
Homebrewing Equipment
Before you can start brewing, you’ll need to assemble the necessary equipment. While advanced brewers may invest in elaborate setups, beginners can start with a few basic items.
Basic equipment
To begin your homebrewing journey, consider acquiring these essential items:
- A large stockpot for boiling your wort. For a 5-gallon recipe, a 5-gallon pot works well. You usually boil the recipe in 2.5 gallons of water and add cold water to bring the volume up to 5 gallons for fermenting.
- A 6.5-gallon fermentation vessel, such as a glass carboy or a plastic fermenting bucket.
- An airlock and stopper to allow gases to escape during fermentation while preventing contaminants from entering.
- A siphon or racking cane for transferring your beer without disturbing the sediment. Transferring beer from one container to another is called racking.
- A hydrometer to measure the specific gravity of your beer, allowing you to gauge fermentation progress.
- A thermometer for monitoring temperatures during the brewing process.
- A 6.5-gallon bottling bucket with a spigot assembly
- A spring-loaded bottle filler
- Bottles and caps for storing and carbonating your finished beer.
- A bottle capper to seal your bottles.
Optional equipment
While not essential for beginners, the following optional items can enhance your brewing experience:
- A wort chiller to rapidly cool your boiled wort.
- A mash tun for all-grain brewing.
- A kegging system for carbonating and serving your beer on tap.
Now that you have your equipment ready, it’s time to move on to the next step: selecting the ingredients for your homebrew.
Selecting Ingredients for Homebrewing
The foundation of any great beer lies in its ingredients, and homebrewing grants you complete control over the flavors you wish to achieve. Let’s take a closer look at the key components of beer and how to choose the right ones.
Malt
Malt is the backbone of beer, providing the sugars necessary for fermentation. It comes in various forms, such as malt extract or whole grains. Beginners often start with malt extract, which simplifies the brewing process. However, as you gain experience, you might explore all-grain brewing using whole grains for further customization.
Hops
Hops add bitterness, flavor, and aroma to beer. They balance the sweetness of the malt and act as a natural preservative. Different hop varieties offer diverse profiles, ranging from floral and citrusy to piney and earthy. Experimenting with various hops enables you to create unique flavor combinations.
Yeast
Yeast is responsible for fermentation, converting sugars into alcohol and carbon dioxide. There are two primary types of yeast: ale yeast and lager yeast. Ale yeast ferments at warmer temperatures, producing fruity and estery flavors. Lager yeast ferments at colder temperatures, resulting in a clean and crisp profile. Each yeast strain imparts its characteristics of the final product.
Water
Water quality affects the outcome of your beer. While tap water can work in some cases, it’s crucial to consider its mineral content. If your local water is not suitable, you may need to modify it using brewing salts or carbon filtration to achieve the desired flavor and balance.
Additional flavors and adjuncts
Apart from the basic ingredients, you can add adjuncts, such as fruits, spices, or even coffee, to create unique flavors. These adjuncts can elevate your homebrew to new heights.
Now that you’ve understood the importance of ingredients in your beer, it’s time to learn about the brewing process itself.
The Brewing Process For Extract Brewing
Brewing beer at home involves several steps, each playing a crucial role in developing the flavors and aromas you desire.
Recipe selection and formulation
Before you begin brewing, select a recipe that aligns with your taste preferences and brewing experience. You can find various recipes online or in brewing books. Alternatively, you can create your own recipe by adjusting malt, hops, yeast, and adjuncts to suit your desired beer style.
Steep Specialty Grains
Many recipes include specialty grains that you need to steep for 20 to 30 minutes as the water warms up. Specialty grains add color, flavor, and in some cases, mouthfeel.
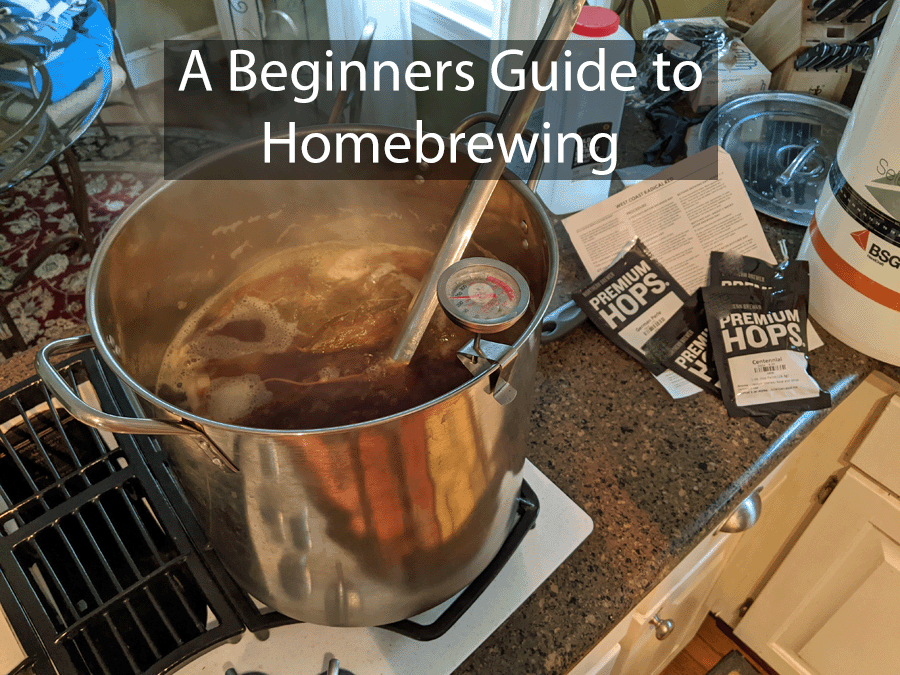
Boiling, adding the extract and hops
After you have steeped any specialty grains, bring you water to a boil. Remove your pot from the burner and stir in your extract. Liquid malt extract (LME) is a little easier to stir in. Dry malt extract (DME) needs more time and patience. You want to make sure any clumps have been broken up. Not thoroughly stirring in either extracts could cause some sediment on the bottom of your brew pot and scorching.
Once you have added the extract, move the pot back onto the burner and bring back to a boil. It is now officially considered wort, a name used to describe unfermented beer. TIP! Watch your wort as it comes to a boil. They can foam up and boil over if you don’t keep an eye on it. You usually have to quickly drop the heating temp, blow on the top of the kettle, and even stir the wort to settle down the foaming. A boil over makes a real mess.
Adding hops at different times during the boil contributes bitterness, flavor, and aroma to the final beer. The hop addition timings heavily influence the character of your brew. Most recipes will tell you what hops, the amount, and at what time in the boil to add them. TIP: Adding the hops can also cause a fast rising foam that can boil over.
Cooling and transferring
Once the boil is complete, it’s essential to rapidly cool the wort to a temperature that can support yeast activity without risking contamination. Using a wort chiller or an ice bath can achieve this. Once cooled, the wort is transferred to a fermentation vessel.
Fermentation
Fermentation is where the magic happens. Yeast is added to the cooled wort, and the vessel is sealed with an airlock. Fermentation can take one to two weeks or longer, during which yeast consumes the sugars, producing alcohol and carbon dioxide. Temperature control is vital during this stage to ensure optimal fermentation conditions and avoid off-flavors.
Carbonation and bottling
Once fermentation is complete, and the desired level of attenuation is reached, it’s time to carbonate the beer. Priming sugar or carbonation drops are added to the beer before transferring it into sanitized bottles. Yeast will consume the additional sugars, generating carbon dioxide and carbonating the beer naturally.
Conditioning and aging
After bottling, the beer should be stored at a controlled temperature for a period to condition and mature. This aging process allows the flavors to mellow and marry, resulting in a well-rounded and balanced beer. Depending on the beer style, conditioning can last from a week to several months.
Congratulations! You’ve successfully brewed your own beer. However, as with any craft, challenges might arise along the way. Let’s explore some troubleshooting tips.
Troubleshooting
Even experienced brewers encounter issues during the brewing process. Here are some common problems and potential solutions:
Common issues and solutions
- Off-flavors: Off-flavors can be caused by poor sanitation, temperature fluctuations during fermentation, or oxidation. Proper cleaning, sanitization, and temperature control are crucial to avoid these issues.
- Cloudy beer: Cloudiness can result from incomplete fermentation, excessive protein content, or suspended yeast. Allowing sufficient time for fermentation and proper fining techniques can help achieve clarity.
- Low carbonation: Insufficient carbonation may be caused by inadequate priming sugar, poorly sealed bottles, or insufficient yeast activity. Carefully follow proper priming measurements and ensure airtight bottle seals.
- High fermentation temperatures: High fermentation temperatures can lead to excessive esters, fusel alcohols, and off-flavors. Monitor and control fermentation temperatures within the recommended range for the yeast strain used.
- Gushing bottles: Gushing bottles occur due to overcarbonation, often caused by excessive priming sugar or incomplete fermentation. Use the correct amount of priming sugar according to your beer style and ensure fermentation is complete before bottling.
With these troubleshooting tips, you’ll have the tools to address common issues and improve your brewing skills. However, there are additional suggestions to help you find success in your homebrewing endeavors.
Tips and Tricks for Homebrewing Success
To guarantee the best results with each batch, consider these essential tips and tricks:
Sanitation and Cleanliness
Maintaining a sterile brewing environment is critical. Before brewing, ensure all equipment is properly cleaned and sanitized. Contaminants can impact the flavor and safety of your beer.
Temperature control
Controlling fermentation temperatures is vital to achieving desirable flavors and avoiding off-flavors. Each yeast strain has an optimal temperature range, so use a thermometer and a temperature-controlled fermentation chamber if possible.
Taking gravity readings
Taking gravity readings at different stages of fermentation allows you to track the yeast’s progress and ensure fermentation is proceeding as expected. This helps you gauge when it’s time to move to the next step or detect any potential issues.
Keeping records
Maintaining detailed records of your brewing process, including ingredients, measurements, and fermentation characteristics, can help replicate successful batches and troubleshoot any problems that arise.
By following these tips, you’ll be well on your way to becoming a homebrewing maestro. But don’t stop here – immerse yourself in the vibrant homebrewing community!
Homebrewing Communities and Resources
Joining a local homebrew club or connecting with other homebrewers online can provide you with invaluable support and inspiration. Consider exploring the following resources:
Local homebrew clubs
Many cities have homebrew clubs where enthusiasts gather to share knowledge and experience. These clubs often organize competitions, tasting events, and educational workshops, fostering a sense of community and learning.
Online forums and websites
Join our community! We are a great place to ask questions, learn from experienced brewers, offer reviews of different recipes, and keep up with the latest trends There are a plethora of other online forums, websites, and social media groups that cater to homebrewing enthusiasts of all skill levels.
Now that you’ve received a comprehensive beginner’s guide to homebrewing, it’s time to roll up your sleeves, acquire the necessary equipment, and start your exciting brewing adventure. Get ready to savor the satisfaction of crafting your own beer, delighting your taste buds, and impressing friends and family with your newfound brewing skills. Cheers!